Categories

Golden Plated Florets


Download (Normal/Matte finish)
Download (Ultra Shiny)


This pattern was based off of a stock image of gold plating with a Japanese floral design hammered into it.  A truly beautiful sheet of metal.  But it looks good on clothes and upholstery and even your walls, not just metal.  I've included two separate files, Matte and Shiny.  The shiny is super high contrast.  So might not look good on things like couches.  That's where the matte comes in handy.  There's only one color channel, but there are 3 sizes.  Large, medium and small.  It even looks pretty good to put the large on a stenciled t-shirt, so the stencil overlays the patterns.  Cool effect.


Additional Credits:

Lovecraft & Sunburst Body Tats


Download

I present to you, my first ever tattoo set.  There are two pieces.  Lovecraft, which is a tattoo design I drew for my second ex-fiance (that's right, two ex-fiances, go me!).  The design is based off of a cover art for an HP Lovecraft book which depicts lots of skulls, a tree with a spider web cocoon wrapped around a body and some rats and spiders.  Perfect for spooky Halloween sims.  I know neither which book it's from nor the name of the artist, I'm sure a little Googling and I can scrounge them up, when I do (or if you know, please don't hesitate to send me the links), I'll add in the credits where they are due.  A link to my artwork version will be at the bottom of this post.  The second is a simple stripey tribal burst pattern.  I call it Sunburst.  It was a design from a stock paintbrush set posted at DeviantART, the link to get that set and credit to the creator will be at the bottom of this post.  Though it is two tone, and I even set up two color channels, I was unable to recolor it in CAS, it kept skipping to the socks or earrings or random other accessory.  If anyone knows a solution to that, please let me know.  Fortunately, I made it a lovely shade of red ;D


Also, I've created custom thumbnails so you can easily find these.  They are categorized under bracelets, following KittyKlan's Tattoo Slot Placement Conventions, which I will attempt to conform to in order to keep my creations layerable with her tattoos.  So chances are, if you have any Robokitty/KittyKlan tattoo's, you will be able to mix and match with mine.  These are both under bracelet to represent chest tattoo.  If you wish to recategorize yours to fit your needs you will need the program CTU or TSR Workshop and will have to manually change which category.  For help with either program, please see those programs threads/tutorials.  Apologies for the fact my thumbnails text doesn't line up, the image you need to make the thumb is square, but in CAS, it is not.  And I didn't realize this and did not save a PSD file of my thumbs and really didn't want to remake them.  Next time will be better.  I had a whole heapload of trouble getting my thumbs to show up properly, but that's a whole 'nother story right there!


Additional Credits:

Model Sim:
Thanks to MS3B for featuring these (and commenting)!

Japanese Theme Patterns


Dragon w/Cherry Blossoms
These were designed for the Builder's Boulevard resources with the Japanese themed neighborhood in mind. These are free to use. However, do not redistribute claiming as your own, nor upload to pay sites. You may include with your lots or Sims, however, please give credit/link back in either description, story or in your blog sections and please notify me of usage.  This pattern comes in 2 sizes. It features a unique specular mapping, so only certain parts should be shiny. (tested in game, seems super shiny, but good for satin fabrics) I do not know the meaning of the Kanji, however a moderator looked it up to find out it means "cherry blossom" ;D


Japanese Dragon Script


This pattern is designed for the Builder's Boulevard resources for the Japanese theme. There are 2 sizes with various 'dirt' layers. Layer 3 or 4 would be dirt layer. Default specular. If there's only 2 layers, it's the clean version with only two recolorable channels. 8 patterns total for this set. The screenshots with the stacks of blocks are illustrating the variances. Dirt1 and 2 are very slight, DoubleDirt is very drastic, it has both Dirt1 and 2. The effects you can achieve can alter the entire color of the pattern as an accent or add a bit of grunginess or even blood (without the splatter, more just excess red)

More to come!


Additional Credits:
  • These patterns were created using Delphy's Pattern Packager

Dragon Floral Credits:
ONLY Stock PS Brushes were used


Dragon Script Credits:

ONLY Stock PS Brushes were used

Thank you to those wonderful creators who made it a lot easier than drawing all of that by hand myself. ;D Considering I hate drawing scales and my flowers suxor. I'd need a reference any way.


Quote:
The moderator who reviewed your submission also had the following suggestions/hints:
Quote:
I looked up your character for you... it means "cherry blossom". You can edit your text with that info if you like
So thanks to the moderator who researched that for me. And that's cool since I used it with Cherry Blossoms in the pattern. I must've known on a subconscious level due to all the anime I've subjected myself to.

Some New Goodies On My Blog

Hey Guys!

Just want to post here I have some new goodies for y'all:

20 Knuckle Tattoos For Both Gender (From Teen - Elder/Recolorable)


And 8 Layered Shirts For YA/A Male


Where to get them?
Come check my blog One-Billion-Pixels [O.B.P]

See you there!
NewOne

P.S. Thank you so much Gillian for this! :)

My New Blog Is Up

Hey All!

It's me NewOne.

Just want to let you know my new blog One-Billion-Pixels (unusual name, I know :) is up now.
You can come and check any time you want.
I'm planning to upload my stuffs to 3 places: MTS, The Rejected and my blog.

Hope to see you there!


NewOne :)

New Features

We've recently added an analysis of our site's visitors.  And hadn't realized the number of foreign languages that visit this page.  As a courtesy, we've added a Google Translation.


We want the accessibility of our contents to be easy to navigate and understand.  If you have any suggestions, please feel free to share them here, or on the new Guestbook (located on the bottom).  There will be some more changes to come, as I'd taken down most of the imagery, and will be adding some more later.  The current layout doesn't work with the old images.

I hope everyone enjoys the new layout.  Please also take notice, you can "Follow" our blog with your Google Reader or in your Blogger Dashboard.  You can do this by "Signing In" and becoming a "Member".

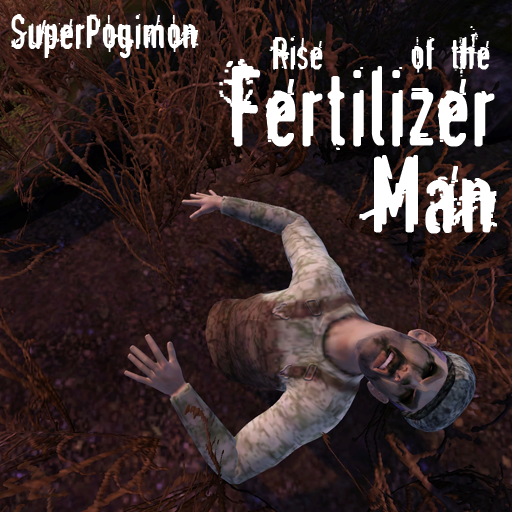
Super Pogimon's Sims (Zombie & Vampire)

Super Pogimon who made these sims

Patient X


AC/DSim


Mr. Fertilizer Man


FISHERMAN'S FIEND


(except Patient X, which EA removed)

Custom Contents Used:
(Super Pogimon, I don't know CC for Patient X, can you post in comments please? I copied this info from the Halloween Showcase thread, let me know if I need to make any changes)


Make Up

GillianIvy is the creator...so awesome! :)


Accessories

For more spine chilling pictures link here

DIRTY, BLOODY, BRUISED HANDS


(Click the pics to make them bigger)

Hi All! :)

Normally I don't make stuff like this but I haven't seen
anyone make something like these so I decided to give it a try.

Here are 6 hand accessories that you can use for
mostly stories, movies and pictures purposes.

I call them "Dirty, Bloody, Bruised Hands"
cause you can make your sims
look like they have dirty, bloody or bruised hands.

They're recolorable (1 alpha channel)
and you can find them in all category outfits,
for Teen through Elder and for both gender.
And they're Non Default.

There are 5 different types for left hands only
and 1 type for right hand only.


Left Hand No 1: Only 2 Finger Recolorable
Left Hand No 2: Only 3 Fingers Recolorable
Left Hand No 3: Only 4 Fingers Recolorable
Left Hand No 4: Only 1 Finger Recolorable
Left Hand No 5: All 5 Fingers Recolorable

Right Hand: All 5 Fingers Recolorable

You can mix and match right hand
with left hands to make them look different.

You can use the right hand with other accessories except the glove.
And you can use all the left hands with other accessories except the left ring.

Also they have their own custom thumbnails
so you can find them very easy in CAS.

Again, these are recolorable and with the right
color you make your sims' hands look dirty, bloody or bruised.

Enjoy and Happy Simming, Everyone!
NewOne

DOWNLOAD
Link

One-Billion-Pixels
[O.B.P]


++++++++

Model by Me:
Hayden, from
here

Custom Content By Me:

Dirty, Bloody, Bruised Hands Accessories

Layered Shirt, from here

Custom Content I used:

Skin by Aikea, from
here
Hair by Bosie, from here
Default Eyes by Sims2Time, from here
Necklace by Rose Sims (Free), from
here
Piercings by Aikea, from
here
Fangs by Aikea, from here

Credits:
Delphy, for CTU Tool
All creators above for creating cool CC! Thankies! :)
Hayden, My model for looking great as a vampire ;)


Featured at MySims3Blog!
My Sims 3 Blog: Dirty, Bloody, Bruised Hands by Newone08

ZACK PHOENIX - My Model of Layered Shirts


Okay so here he is as request,
Zack Phoenix
my model of Layered Shirts

(Click the pics to make them bigger)

-------------

Zack is a very talented young man.
He is also funny, excitable and perfectionist.
He sounds like a perfect guy, doesn't he?
Well, wait until he shows some attitude
then there will be no more Mr. Right. ;)

Age:
Young Adult
Traits:
Good Sense Of Humor, Excitable, Perfectionist, Artistic, Inappropriate
Likes:
Custom Music, Hamburger, BlackLifetime
Wish:
Golden Tounge, Golden Fingers

DOWNLOAD
LINK

One-Billion-Pixels -updated
[O.B.P]


----------------------

IMPORTANT

You need Rick+Delphy's Slider Hack/Awesomemod/Indie Stone
if you want to tweak his face and the sliders won't resetting to default
You can get Slider Hack, from here

Custom Content By Me

Layered Shirt, from here

Custom Content I used

Skin by Aikea, from here
Hair by Cazy, from here
Facial Hair by Robokitty, from here
Default Eyes by Sims2Time, from here

How to install
Extract the sim. file from the zip.
Place in My Documents/Electronic Arts/The Sims 3/SavedSims.
In the game, go to the Premade Sims Bin in Create A Sim (CAS)

Credits
Rick & Delphy, for the hack
Delphy, for CTU Tool
All creators above for creating cool CC! Thankies! :)

Mask Tutorial


Download (Mask Only)

This mask was created for tutorial purposes. At the bottom of this post is the link to download the mask with PSD work file (layers intact), DDS files and the tutorial images. The images contained therein may be used for stock purposes, base for Sims 3 creations. Please link back to me with credit. Please do not claim my tutorial, the images (my face!) as your own. The mask has 4 color channels. All should be set to white (though you can tint them as desired) except the eye color, which is a thin sliver of color on the chooser.

Face Mask Overlaysby GillianIvy

1. Duplicate each layer (except bg) to make white out layers. On each, go to Hue/Saturation and set lightness to 100. This will turn the image completely white. Underneath each white layer, create a new layer and fill with black. Merge the white on top of black. In the image here, you will see I have two layers, one for the overlay alpha. And the second for the color channel in the mask file.

2. Hide all your alpha whiteouts. Again, duplicate each layer, this time bg too. Hide everything but duplicates. Merge them all together. So you now have a complete picture for your overlay.

Tutorial pt. 1

3. Okay, now go to BG Copy layer (#3), select all and copy. New file (Overlay), paste, flatten. New file (Mask) paste, flatten. You now have two separate files which look identical. Go back to your work file. Go to your overlay whiteout (#1), select all, copy. Go to your Overlay file. Select the "Channels" tab, not "Layers", now add new layer. A new blank alpha will appear. Paste. You will now have an image like Overlay.dds pictured above. Save as a DDS, either DXT3 or DXT5. Go back to work file and copy your mask whiteout (#2). Go to your mask file and "Channels", add new alpha, paste. Should appear like the Mask.dds file pictured above. Save as DDS either DXT3 or DXT5. DXT5 is better for high detail, as DXT3 may have some loss. You are finished in image editor, open CTU.

Tutorial pt 2

4. New file. Choose CAS part, this case it's Adult>>Female>>Makeup>>BlushMulti. Select the "Design" tab and add new design. Under "Textures" tab, adjust your tints, change all to white, except for last one for eye color. Enable Color D. Select Face Overlay, click replace, choose your Overlay.dds file. Select Mask, choose your Mask.dds file. Click "Commit". If you need to, edit the part category, it is set to blush for this tutorial. Blush is good for skin masks, as you can layer make-up and costume on top of it.

5. Install your new package. You may need to do some back and forthing to check for edits. (ie removing eyebrows, they can tend to look bad, not sure if costume category is better for that, blush category makes it so you can add lipsticks or some eyeshadows if they're done in mask layers or if your image has more transparency around eyes.)

Final image should come out like this:


Required:


Downloads:

Additional Credits:

Latest Featured Download