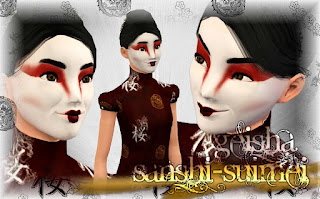
Download (Mask Only)
This mask was created for tutorial purposes. At the bottom of this post is the link to download the mask with PSD work file (layers intact), DDS files and the tutorial images. The images contained therein may be used for stock purposes, base for Sims 3 creations. Please link back to me with credit. Please do not claim my tutorial, the images (my face!) as your own. The mask has 4 color channels. All should be set to white (though you can tint them as desired) except the eye color, which is a thin sliver of color on the chooser.
| Face Mask Overlays | by GillianIvy |
1. Duplicate each layer (except bg) to make white out layers. On each, go to Hue/Saturation and set lightness to 100. This will turn the image completely white. Underneath each white layer, create a new layer and fill with black. Merge the white on top of black. In the image here, you will see I have two layers, one for the overlay alpha. And the second for the color channel in the mask file.
2. Hide all your alpha whiteouts. Again, duplicate each layer, this time bg too. Hide everything but duplicates. Merge them all together. So you now have a complete picture for your overlay.

3. Okay, now go to BG Copy layer (#3), select all and copy. New file (Overlay), paste, flatten. New file (Mask) paste, flatten. You now have two separate files which look identical. Go back to your work file. Go to your overlay whiteout (#1), select all, copy. Go to your Overlay file. Select the "Channels" tab, not "Layers", now add new layer. A new blank alpha will appear. Paste. You will now have an image like Overlay.dds pictured above. Save as a DDS, either DXT3 or DXT5. Go back to work file and copy your mask whiteout (#2). Go to your mask file and "Channels", add new alpha, paste. Should appear like the Mask.dds file pictured above. Save as DDS either DXT3 or DXT5. DXT5 is better for high detail, as DXT3 may have some loss. You are finished in image editor, open CTU.

4. New file. Choose CAS part, this case it's Adult>>Female>>Makeup>>BlushMulti. Select the "Design" tab and add new design. Under "Textures" tab, adjust your tints, change all to white, except for last one for eye color. Enable Color D. Select Face Overlay, click replace, choose your Overlay.dds file. Select Mask, choose your Mask.dds file. Click "Commit". If you need to, edit the part category, it is set to blush for this tutorial. Blush is good for skin masks, as you can layer make-up and costume on top of it.
5. Install your new package. You may need to do some back and forthing to check for edits. (ie removing eyebrows, they can tend to look bad, not sure if costume category is better for that, blush category makes it so you can add lipsticks or some eyeshadows if they're done in mask layers or if your image has more transparency around eyes.)
Final image should come out like this:

Required:
- Photo editing program such as - Adobe Photoshop (purchase), GIMP 2.0 (free), Paint.NET 3.36 (free)
- Delphy's CAS Texture Unitool
- Nvidia DDS plugins for Adobe Photoshop or GIMP
Downloads:
- The Sim - GillianIvy - Mask - by GillianIvy
- The Mask, PSD file and DDS files and Tutorial images - GillianIvy Mask Tutorial
- Aikea Guinea's Extracted eye multiplier, with bonus facial overlays for changing the whites and Extracted basic skintones. from her tutorials Default Replacement Eyes, Plus Changing The Whites by Aikea Guinea and Creating Default Replacement Skintones for TS3 by Aikea Guinea.
- Pattern depicted is by myself and available for download here: Japanese Theme Patterns Pt. 1
- and Mel Calero's "Ornamental Grunge" (not depicted, on alternate outfit of sim)
- -In A Parallel Universe- Peggy Aug 09 Gift *Updated, Please Re-Download* by Bosie on GoS